How to Install an SSL Certificate on WordPress (2026)
Install a free SSL certificate on WordPress: issue it in your hosting panel, switch both URLs to https, force HTTPS and fix mixed content.

On this page
- Step 1: Take a backup
- Step 2: Issue the free SSL certificate in your hosting panel
- Step 3: Check the certificate in the browser
- Step 4: Change the WordPress and Site Address to https
- Step 5: Force HTTPS with a 301 redirect
- Step 6: Fix mixed content
- Step 7: Update Search Console and analytics
- Troubleshooting
- FAQs
To install an SSL certificate on WordPress, issue the free certificate (usually Let's Encrypt) in your hosting panel, change both the WordPress Address and Site Address in Settings > General to https://, redirect all HTTP traffic to HTTPS, and replace old http:// links in the database so there is no mixed content. Most hosts include the certificate free and renew it automatically.
Time required: 20 to 40 minutes (the certificate itself can take up to a few hours to issue)
What you'll need:
- Login to your hosting panel (hPanel, cPanel or similar)
- WordPress admin access
- A full backup taken today
- Your domain already pointing at the hosting
If you see "Not secure" or "Your connection is not private" after this, read SSL certificate errors explained for what each message means.
Step 1: Take a backup
Where: Hosting panel > Backups, or your backup plugin
Switching to HTTPS changes the site address. If something goes wrong you can be locked out of the admin, so take a full backup (files and database) first. The UpdraftPlus backup tutorial shows one way to do it.
Step 2: Issue the free SSL certificate in your hosting panel
Where: hPanel > Security > SSL (cPanel: SSL/TLS Status or Let's Encrypt)
- Log in to your hosting panel and open the SSL section.
- Find your domain. If the status is not Active, click Install SSL (or Run AutoSSL in cPanel).
- Choose the free certificate and make sure it covers both
yourdomain.comandwww.yourdomain.com.
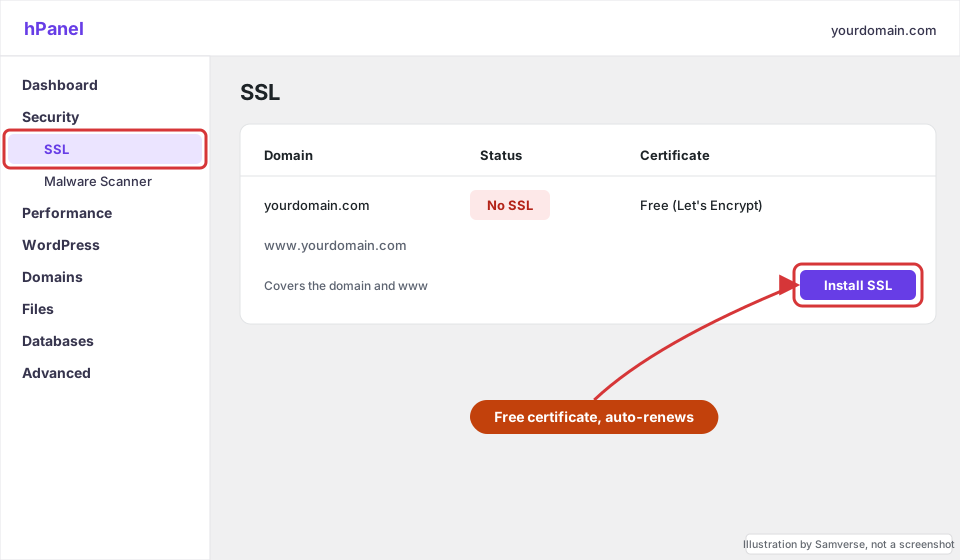
Issuing can take from a few minutes to a few hours. It fails if the domain does not yet point at this hosting, so check DNS first.
Step 3: Check the certificate in the browser
Open https://yourdomain.com in a private window. You should see the padlock (the page may still show warnings about insecure content; that is fixed in Step 6). If the browser says the certificate is for another name, the certificate has not finished issuing or does not cover that variant.
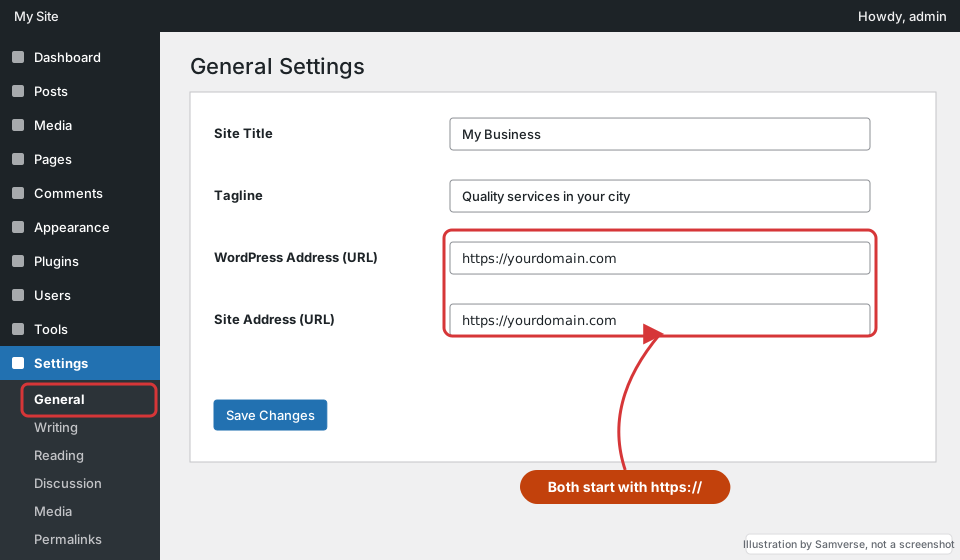
Step 4: Change the WordPress and Site Address to https
Where: WordPress admin > Settings > General
- Go to Settings > General.
- Change WordPress Address (URL) and Site Address (URL) from
http://tohttps://. Keep www or non-www exactly as it was. - Click Save Changes. WordPress logs you out; log back in on the https address.
Step 5: Force HTTPS with a 301 redirect
Where: Hosting panel > Force HTTPS toggle, or .htaccess in the site root
Many panels have a Force HTTPS switch next to the certificate. Turn it on. If yours does not, add this at the top of .htaccess on Apache or LiteSpeed hosting:
RewriteEngine On
RewriteCond %{HTTPS} off
RewriteRule ^(.*)$ https://%{HTTP_HOST}/$1 [L,R=301]
Test by opening http://yourdomain.com/any-page/: it should land on the https version of the same page in one hop.
Step 6: Fix mixed content
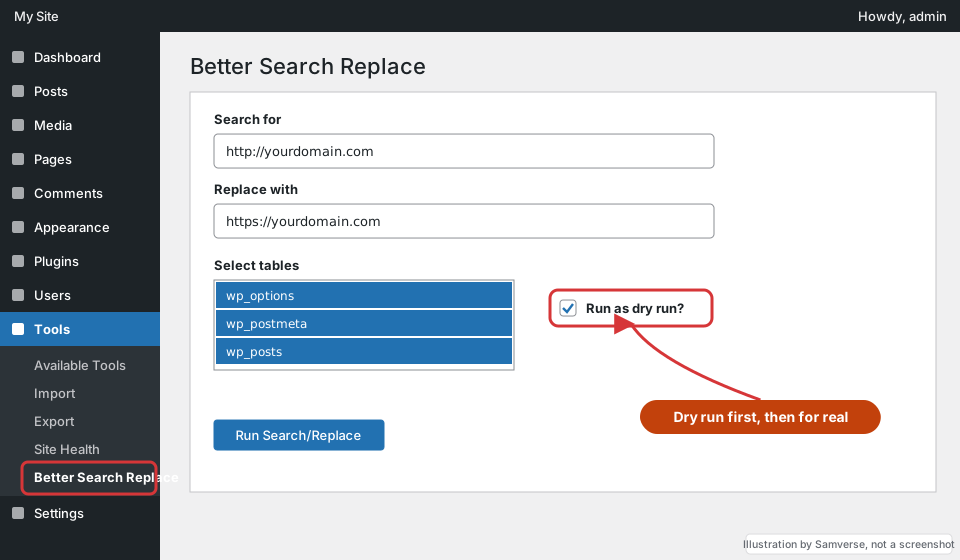
Where: WordPress admin > Tools > Better Search Replace
Old posts and page-builder data still contain http://yourdomain.com links to images and pages, which cause "not fully secure" warnings.
- Install and activate Better Search Replace.
- Search for
http://yourdomain.com, replace withhttps://yourdomain.com, select all tables. - Run it once with Run as dry run ticked, check the count, then untick it and run for real.
- Clear every cache (plugin, host and CDN).
If you use Elementor, also run Elementor > Tools > Replace URL. Hard-coded http links in theme files or custom code need editing by hand.
Step 7: Update Search Console and analytics
- In Google Search Console, a Domain property covers https automatically. If you use URL-prefix properties, add the https version and submit
/sitemap.xmlthere. - In GA4, update the web stream URL to https.
- Update the website link on your Google Business Profile and social profiles.
Troubleshooting
- Too many redirects after Step 4 or 5: often a CDN such as Cloudflare set to Flexible SSL. Set it to Full (strict), or remove the extra redirect rule.
- Locked out after changing the addresses: add
define('WP_HOME','https://yourdomain.com');anddefine('WP_SITEURL','https://yourdomain.com');towp-config.php, or fix thesiteurlandhomerows inwp_options. - Padlock still missing on some pages: open DevTools > Console; it lists each http resource still loading.
- Certificate will not issue: check the A record points at this host and there is no old AAAA record pointing elsewhere.
FAQs
Do I need to buy an SSL certificate for WordPress?
Usually not. Most hosts provide a free Let's Encrypt certificate that renews automatically. A paid certificate does not make the padlock more secure for a normal business site.
Will moving to HTTPS hurt my SEO?
Not if every http URL redirects with a 301 to the same https URL. Google treats it as a site move on the same domain, and rankings normally carry over.
Do I need the Really Simple SSL plugin?
It is optional. It automates Steps 4 to 6, but the manual method keeps one fewer plugin on the site. Either way the certificate itself comes from your host.
Stuck on a step?
Tell me where you got stuck and I'll reply with a plan and a fixed quote, usually within 24 hours.