How to Connect a Domain to Shopify: Step-by-Step (2026)
Connect a domain you own to Shopify: add it in Settings > Domains, set the A and www CNAME records at your registrar, verify, then make it primary.

On this page
- Step 1: Start the connection in Shopify
- Step 2: Write down your current DNS records
- Step 3: Point the A record and the www CNAME to Shopify
- Step 4: Verify the connection and set the primary domain
- Step 5: Check email, redirects and Search Console
- Moving from WordPress or another platform? Plan the switch
- Troubleshooting
- FAQs
To connect a domain to Shopify, go to Settings > Domains > Connect existing domain in Shopify, enter your domain, then at your domain registrar set an A record for @ to 23.227.38.65 and a CNAME for www to shops.myshopify.com. Back in Shopify, click Verify, and set the domain as primary.
Time required: 15 minutes of work, then up to 48 hours for DNS to update (often much less)
What you'll need:
- A Shopify store on a paid plan
- Login to the registrar where you bought the domain (GoDaddy, Hostinger, BigRock, Namecheap and so on)
- A note of any existing email (MX) records, so you do not break email
This keeps the domain registered where it is (you keep paying the renewal there) and leaves your email records alone. If you want Shopify to manage the whole domain instead, you can transfer it, but that is a separate process (see transferring a domain to another registrar).
Step 1: Start the connection in Shopify
Where: Shopify admin > Settings > Domains > Connect existing domain
- In Shopify admin, click Settings (bottom left), then Domains.
- Click Connect existing domain.
- Type your domain without
https://orwww, for exampleyourdomain.com, and click Next.
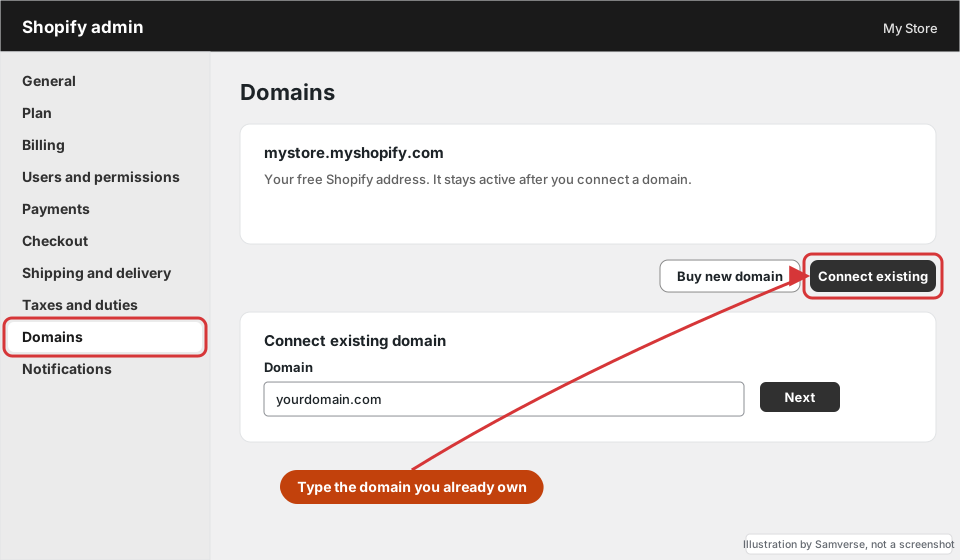
Shopify may offer to connect automatically if your registrar supports it. That is fine to use; the manual steps below are what it does for you, and they work with every registrar.
Step 2: Write down your current DNS records
Where: Your registrar > Domains > yourdomain.com > DNS / Manage DNS
Before changing anything, open your registrar's DNS page and take a screenshot of every record. In particular note the MX and TXT records: those run your business email (Google Workspace, Zoho, Hostinger email and so on) and must not be deleted. You will only touch two records.
If your site was on WordPress before, also note the old A record. That way you can switch back quickly if you need to.
Step 3: Point the A record and the www CNAME to Shopify
Where: Registrar DNS zone: A record (@) and CNAME record (www)
- Edit the A record with name/host
@(sometimes shown as blank or as your domain) and set the value to23.227.38.65. If there are several A records for@, delete the extra ones so only Shopify's remains. - Edit the CNAME with name
wwwand set it toshops.myshopify.com. Ifwwwis an A record instead, delete it and create the CNAME. - If there is an AAAA record for
@pointing at your old host, remove it, otherwise some visitors still reach the old server. - Save. Leave MX, TXT (SPF, DKIM, DMARC, verification) and any other records exactly as they were.
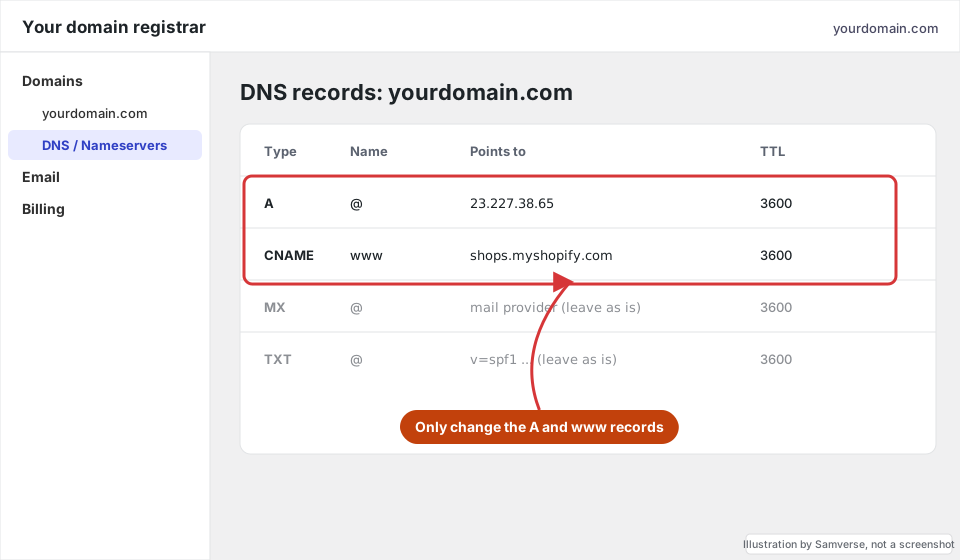
Some registrars insist on the full name, such as www.yourdomain.com, or add a trailing dot. Follow the format the other records on the page already use.
Step 4: Verify the connection and set the primary domain
Where: Shopify admin > Settings > Domains
- Back in Shopify, click Verify connection. If it says the records are not found yet, wait 30 to 60 minutes and try again.
- Once connected, open Change primary domain (or the menu next to the domain) and choose
yourdomain.comorwww.yourdomain.com. Pick one and keep it. - Make sure the option to redirect all traffic to the primary domain is on, so the
myshopify.comaddress and the other variant redirect to it.
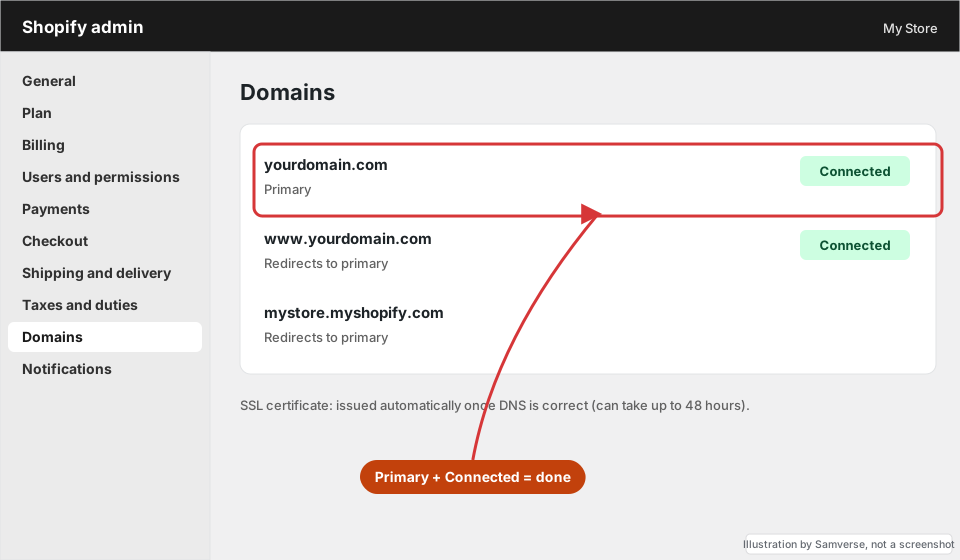
Shopify issues a free SSL certificate automatically once DNS is correct. The padlock can take a while to appear; do not buy a separate certificate.
Step 5: Check email, redirects and Search Console
- Send an email to your business address from Gmail and reply to it, to confirm email still works.
- Open
http://,https://,wwwand non-www versions of your domain: all four should land on the same primary URL. - If you moved from another platform, set up URL redirects in Content > Menus > URL Redirects (or Online Store > Navigation in older admins) for old page URLs. The migration guide covers the reverse move, and the same redirect logic applies.
- Add the domain to Google Search Console and submit
/sitemap.xml.
Moving from WordPress or another platform? Plan the switch
If the domain currently shows a live website, the moment the A record changes, visitors start seeing Shopify instead. A little planning avoids a broken day:
- Finish the store first. Products, policies, payments and shipping should be ready, and the store password (Online Store > Preferences) removed, before you change DNS.
- Lower the TTL a day ahead. If your registrar lets you edit TTL, set the A and www records to a short value (such as 300 seconds) the day before. The switch then spreads faster, and so does a rollback.
- List your old URLs. Export the old sitemap and your top pages from Search Console. Shopify URLs follow fixed patterns (
/products/,/collections/,/pages/,/blogs/news/), so most old URLs need a redirect. - Keep the old hosting for a few weeks. Do not cancel it the same day. You may need old files, images or the database, and your email may still be hosted there.
- Check subdomains. If you use subdomains such as
blog.yourdomain.comorshop.yourdomain.comfor other services, leave their records alone; only@andwwwmove to Shopify.
Switch on a quiet day and time, not during a sale or festival campaign, and test checkout on the live domain once the padlock appears.
Troubleshooting
- "Domain not connected" after a day: check for a second A record or an AAAA record on
@still pointing to the old host. Use a public DNS checker to see what the world sees. - www works but the bare domain does not (or the reverse): one of the two records is wrong. The A record handles the bare domain; the CNAME handles www.
- Your domain uses Cloudflare nameservers: make the changes in Cloudflare's DNS tab, not at the registrar, and set both records to DNS only (grey cloud).
- Email stopped working: an MX record was deleted or changed. Restore it from your screenshot.
FAQs
How long does it take to connect a domain to Shopify?
The setup takes about 15 minutes. DNS changes usually show within a few hours, but Shopify allows up to 48 hours before the connection and SSL are complete.
Will connecting my domain to Shopify affect my email?
No, as long as you only change the A record for @ and the CNAME for www. Email depends on the MX and TXT records, which you leave untouched.
Do I have to transfer my domain to Shopify?
No. Connecting keeps the domain at your current registrar. Transfer only if you want Shopify to handle renewals and DNS.
Stuck on a step?
Tell me where you got stuck and I'll reply with a plan and a fixed quote, usually within 24 hours.