How to Set Up Cloudflare for WordPress: Step-by-Step (2026)
Set up Cloudflare for WordPress: add your domain on the Free plan, check DNS, change nameservers, set SSL to Full (strict) and avoid redirect loops.

On this page
- Step 1: Make sure your site already has SSL
- Step 2: Add your domain to Cloudflare
- Step 3: Check the imported DNS records
- Step 4: Change the nameservers at your registrar
- Step 5: Set SSL/TLS to Full (strict) and force HTTPS
- Step 6: Tidy up caching inside WordPress
- Settings worth leaving alone at first
- Troubleshooting
- FAQs
To set up Cloudflare for WordPress, create a free Cloudflare account, add your domain and pick the Free plan, check the imported DNS records, replace your registrar's nameservers with the two Cloudflare gives you, then set SSL/TLS to Full (strict) and turn on Always Use HTTPS. The site keeps its hosting; Cloudflare sits in front as a proxy and CDN.
Time required: 30 minutes, plus up to 24 hours for the nameserver change
What you'll need:
- Login to your domain registrar
- Login to your hosting (to confirm the site has a valid SSL certificate)
- WordPress admin access
- A free Cloudflare account
New to CDNs? What a CDN is and when you need one explains what Cloudflare changes and what it cannot fix (a slow server is still slow on uncached pages).
Step 1: Make sure your site already has SSL
Open your site at https:// and check there is a valid padlock with no warning. Most Indian hosts (Hostinger, cPanel hosts) issue a free certificate. Cloudflare's safest mode, Full (strict), needs this certificate on the server. If it is missing, fix it first using SSL certificate errors and how to fix them.
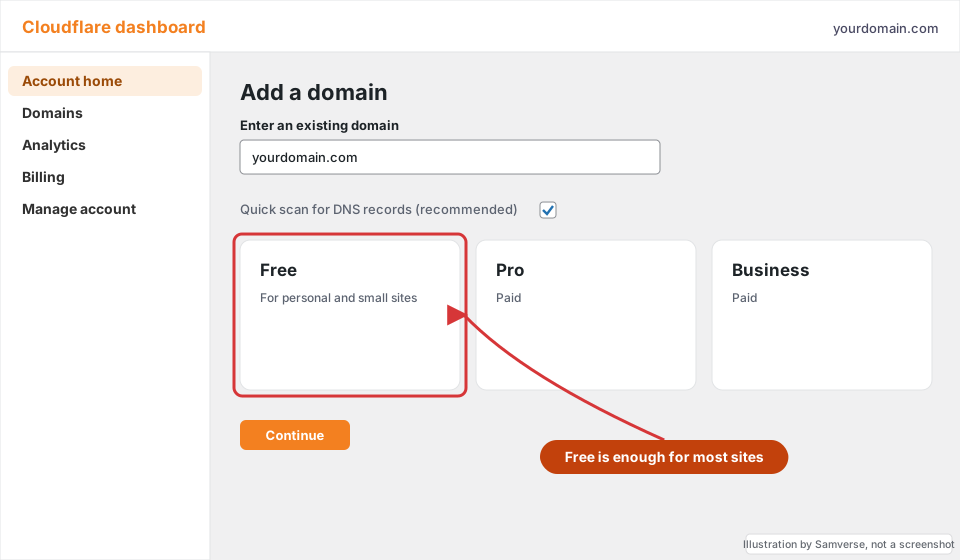
Step 2: Add your domain to Cloudflare
Where: Cloudflare dashboard > Account home > Add a domain (older dashboards: Add a site)
- Sign up or log in at Cloudflare and click Add a domain.
- Enter
yourdomain.comand keep the quick DNS scan selected. - Choose the Free plan and continue.
Step 3: Check the imported DNS records
Where: Cloudflare > your domain > DNS > Records
Cloudflare copies the records it can find. Compare them with your registrar or host DNS page, line by line:
- The A record for
@and thewwwrecord should point to your hosting server and be Proxied (orange cloud). - MX records and mail-related A records (such as
mail) must exist and be DNS only (grey cloud). Email cannot pass through the Cloudflare proxy. - TXT records for SPF, DKIM, DMARC and Google verification must all be copied. Missing DKIM records are the usual cause of email problems after a Cloudflare move.
Add anything missing by hand before you change nameservers. This is the step that decides whether the switch is invisible or breaks email.
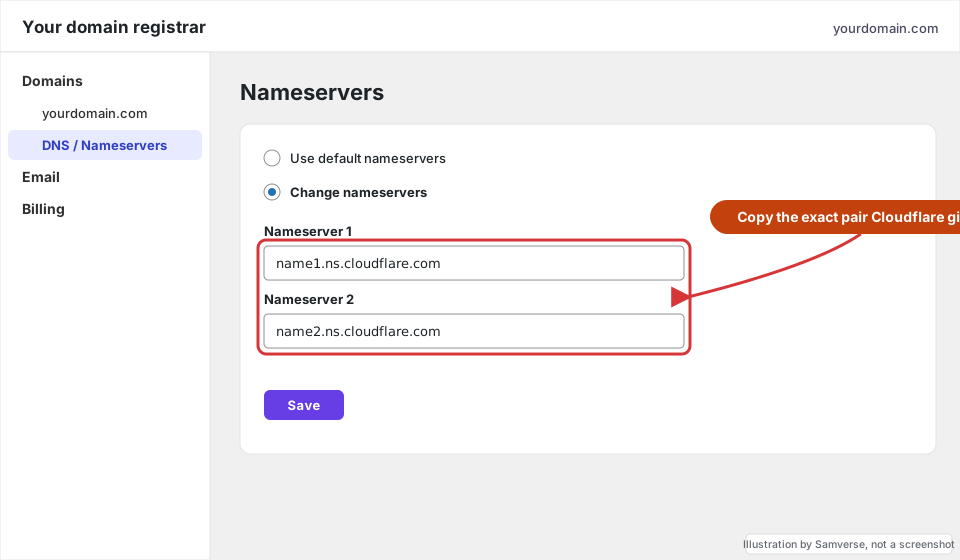
Step 4: Change the nameservers at your registrar
Where: Registrar > Domains > yourdomain.com > DNS / Nameservers > Change nameservers (in Hostinger hPanel: Domains > your domain > DNS / Nameservers)
- Cloudflare shows two nameservers assigned to your account, such as
name1.ns.cloudflare.com. Your pair will have different names. - At the registrar, choose Change nameservers (or Custom nameservers), replace the existing ones with exactly those two, and save.
- If your registrar has DNSSEC turned on, turn it off first, then re-enable it later from Cloudflare.
Cloudflare emails you when the domain is active. This often takes under an hour but can take up to a day. The site stays online during the change.
Step 5: Set SSL/TLS to Full (strict) and force HTTPS
Where: Cloudflare > your domain > SSL/TLS > Overview, then SSL/TLS > Edge Certificates
- In SSL/TLS > Overview, set the encryption mode to Full (strict). Newer dashboards may show an automatic mode; switch it to custom Full (strict) if your server has a valid certificate.
- In SSL/TLS > Edge Certificates, turn on Always Use HTTPS.
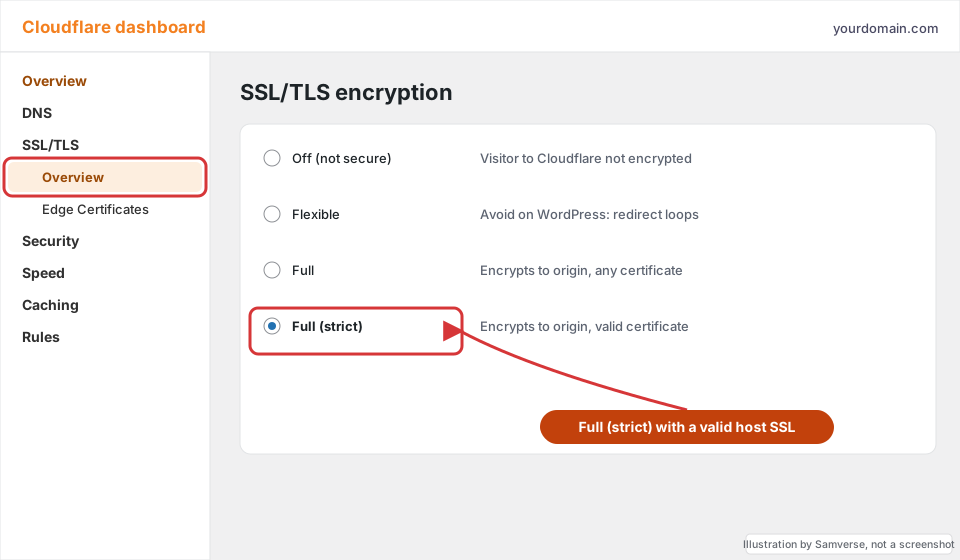
Do not use Flexible. WordPress (or your host) forces HTTPS, Cloudflare connects over HTTP, and the two keep redirecting each other: the "too many redirects" error.
Step 6: Tidy up caching inside WordPress
- Keep your existing page cache plugin (LiteSpeed Cache, WP Rocket and so on). Cloudflare's free plan caches static files such as images, CSS and JS by default, not HTML pages.
- Turn off any "minify" or "Rocket Loader" style options in Cloudflare if your cache plugin already optimises files, so the same work is not done twice. Test forms and checkout after any change.
- After a design change, purge both caches: your plugin's and Caching > Configuration > Purge Everything in Cloudflare.
- If your host offers its own CDN, use one CDN, not both.
Read WordPress caching explained for how the layers fit together.
Settings worth leaving alone at first
Cloudflare has many switches, and turning everything on is the fastest way to break a WordPress site. For the first week, change only what this tutorial covers, then add more one at a time and test after each:
- Security level and bot settings: aggressive settings can challenge real visitors, payment gateway callbacks (such as Razorpay webhooks) and uptime monitors. If you tighten them, check that webhooks still arrive.
- Cache rules that cache everything: caching full HTML pages without excluding
/wp-admin/, the login page, cart, checkout and my-account pages will show one user's data to another. Leave HTML caching to your WordPress cache plugin or a purpose-built WordPress option. - Email obfuscation and similar content rewrites: these alter your HTML and can interfere with forms or scripts. Try them only if you know why you need them.
- Development Mode: handy while designing, because it bypasses Cloudflare's cache for a few hours. Remember it switches itself off.
Keep a short note of every Cloudflare setting you change and the date. When something breaks weeks later, that note turns an hour of guessing into a two-minute fix. If you have a security plugin with its own firewall, read WordPress firewalls explained to understand how Cloudflare's edge protection and a plugin firewall overlap.
Troubleshooting
- Too many redirects: SSL mode is Flexible. Switch to Full (strict).
- Error 526 (invalid SSL certificate): the server's certificate is missing or expired. Reissue it at your host, or use Full (not strict) temporarily while you fix it.
- Email stopped: an MX or DKIM record was not copied, or a mail record is proxied. Set mail records to DNS only.
- Changes not showing: purge Cloudflare's cache and your plugin's cache, then check in a private window.
FAQs
Is Cloudflare free for WordPress?
Yes, the Free plan covers DNS, the CDN for static files, free SSL at the edge and basic DDoS protection. Paid plans and add-ons add features such as full-page caching for WordPress.
Does Cloudflare make WordPress faster?
It speeds up images, CSS and JS for visitors far from your server, and absorbs bad traffic. It does not fix a slow server or heavy plugins on uncached pages.
Can I use Cloudflare without changing nameservers?
On the Free plan, no. The standard setup needs Cloudflare's nameservers; partial (CNAME) setup is limited to paid plans.
Stuck on a step?
Tell me where you got stuck and I'll reply with a plan and a fixed quote, usually within 24 hours.