How to Add Razorpay to WooCommerce: Step-by-Step (2026)
Add Razorpay to WooCommerce in 6 steps: install the official plugin, create test API keys, paste them in Payments, add the webhook, test, then go live.

On this page
- Step 1: Check your Razorpay account is ready
- Step 2: Install the Razorpay for WooCommerce plugin
- Step 3: Generate test API keys in Razorpay
- Step 4: Paste the keys into WooCommerce
- Step 5: Add the Razorpay webhook
- Step 6: Place a test order, then go live
- After launch: what to check in the first week
- Troubleshooting
- FAQs
To add Razorpay to WooCommerce, install the official Razorpay for WooCommerce plugin, generate API keys in the Razorpay Dashboard, paste the Key ID and Key Secret into WooCommerce > Settings > Payments > Razorpay, add a webhook, and place a test order before switching to live keys. Customers then pay by UPI, cards, netbanking or wallets on your checkout.
Time required: 30 to 45 minutes (plus Razorpay account activation, which can take a few days)
What you'll need:
- A WordPress site with WooCommerce installed and HTTPS working
- A Razorpay account (business details and KYC submitted)
- Admin access to WordPress
- A phone with a UPI app or a card for the live test
This tutorial is the hands-on part. If you are still choosing a gateway, read how to accept online payments on WordPress in India first.
Step 1: Check your Razorpay account is ready
Where: Razorpay Dashboard > Home
Log in to the Razorpay Dashboard. You can build and test everything in Test Mode straight away, but live payments only work once Razorpay has approved your account (business details, KYC documents and your website URL). Razorpay reviews the website itself, so make sure these pages are live and linked in your footer before you apply:
- A contact page with a real address, phone and email
- Terms and conditions, privacy policy, and a refund and cancellation policy (see writing a WooCommerce returns and refunds policy)
- Shipping or delivery policy, and product pages with clear prices
Missing policy pages are one of the most common reasons an activation is held up, so do this first.
Step 2: Install the Razorpay for WooCommerce plugin
Where: WordPress admin > Plugins > Add New Plugin
- In WordPress, go to Plugins > Add New Plugin.
- Search for Razorpay.
- Find Razorpay for WooCommerce by Team Razorpay and click Install Now, then Activate.
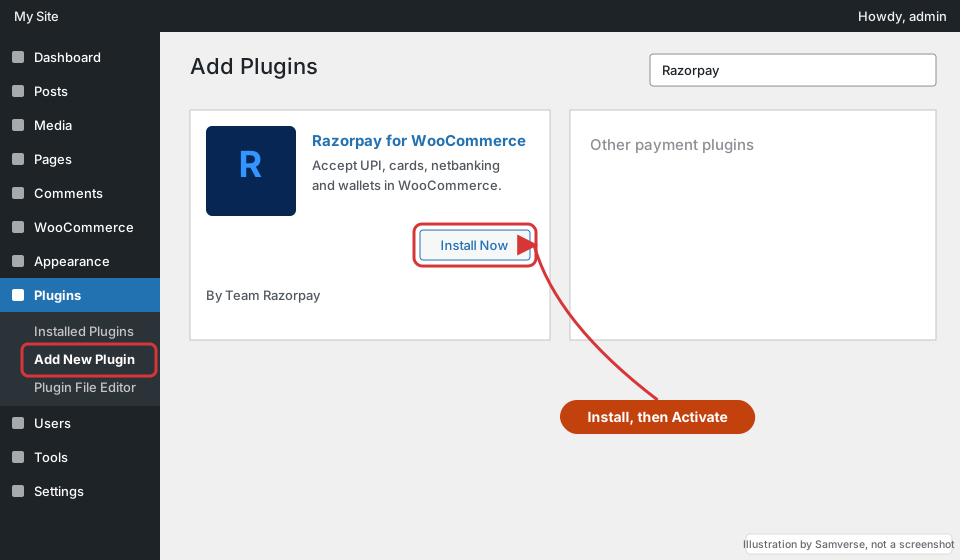
Use the official plugin from the WordPress.org directory. Avoid "nulled" or re-uploaded copies of payment plugins: a tampered payment plugin is exactly where card skimmers hide (see WooCommerce checkout skimmer malware).
Step 3: Generate test API keys in Razorpay
Where: Razorpay Dashboard > Account & Settings > API keys (with Test Mode on)
- Switch the dashboard to Test Mode using the mode toggle at the top.
- Open Account & Settings and, under Website and app settings, click API keys.
- Click Generate Key. Copy the Key ID (it starts with
rzp_test_) and the Key Secret.
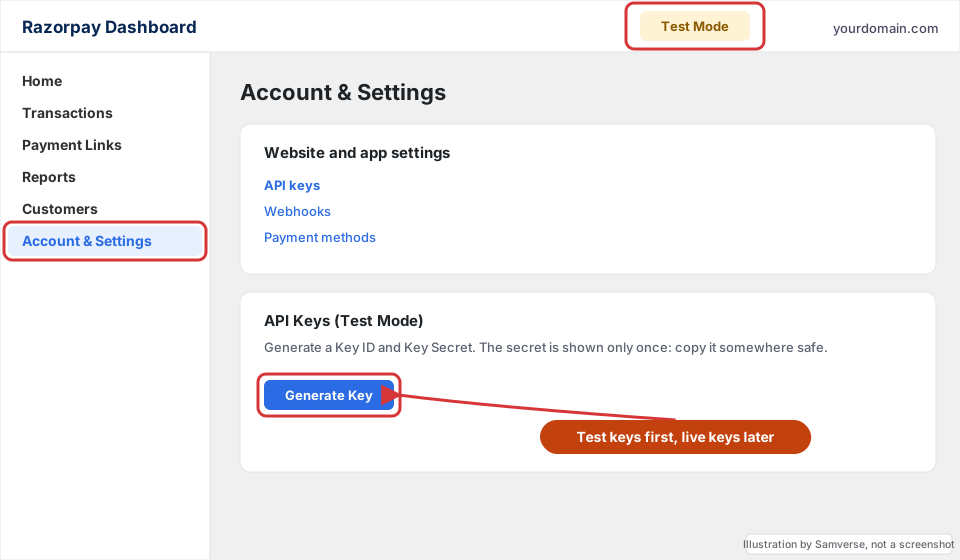
The Key Secret is shown only once. Save it in a password manager, not in an email or a WhatsApp chat. If you lose it, you simply regenerate the key and paste the new pair into WooCommerce.
Step 4: Paste the keys into WooCommerce
Where: WordPress admin > WooCommerce > Settings > Payments > Razorpay
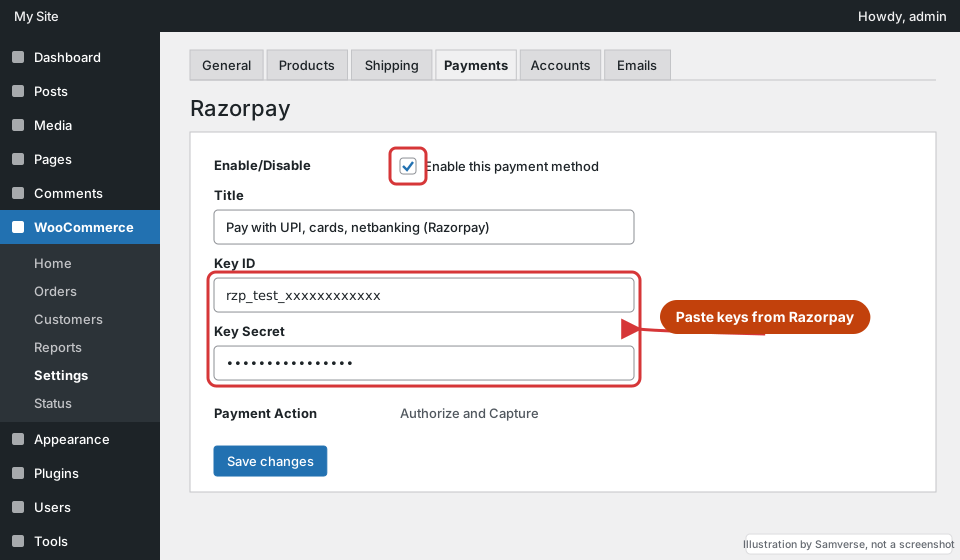
- Go to WooCommerce > Settings > Payments and open Razorpay (click Manage or Set up, depending on your WooCommerce version).
- Tick Enable this payment method.
- Set a clear Title such as "Pay with UPI, cards, netbanking (Razorpay)". This is what shoppers see.
- Paste the Key ID and Key Secret.
- Leave Payment Action on Authorize and Capture unless you deliberately capture payments by hand.
- Click Save changes.
Step 5: Add the Razorpay webhook
Where: Razorpay Dashboard > Account & Settings > Webhooks > Add New Webhook
The webhook lets Razorpay tell your store about a payment even if the shopper closes the browser before returning to your thank-you page. Without it you can end up with "Pending payment" orders that were actually paid.
- In the Razorpay Dashboard (still in Test Mode), open Account & Settings > Webhooks and click Add New Webhook.
- Webhook URL:
https://yourdomain.com/wp-admin/admin-post.php?action=rzp_wc_webhook(replace with your domain). - Create a Secret (any strong random string) and note it.
- Under active events, tick at least payment.authorized and order.paid, plus the refund events if you refund from the dashboard.
- Save, then paste the same secret into the Webhook Secret field on the Razorpay settings page in WooCommerce, and save again.
If a security plugin or firewall blocks admin-post.php for outside requests, allow this URL, or webhooks will silently fail.
Step 6: Place a test order, then go live
Where: Your shop front end, then WooCommerce > Orders
- Open your shop in a private window, add a product to the cart and check out with Razorpay.
- In the Razorpay test popup, use one of the test payment methods Razorpay shows for test mode and complete the payment.
- In WooCommerce > Orders, confirm the order moved to Processing and the order notes show the Razorpay payment ID.
- In Razorpay, switch to Live Mode, generate live keys (they start with
rzp_live_), add the webhook again in live mode, and replace the test keys in WooCommerce. - Make one small real payment with your own UPI app, check the order, then refund it from the Razorpay Dashboard.
Test and live webhooks are separate. Forgetting to add the live webhook is the most common reason orders stay pending after launch.
After launch: what to check in the first week
A payment setup that passes one test can still fail on real traffic. In the first week, check these each day for a few minutes:
- Match orders to payments. In Razorpay, open Transactions > Payments and compare the captured payments with WooCommerce orders in Processing. Every captured payment should have an order, and every Processing order should have a payment ID in its notes.
- Look at failed and pending orders. A few "Pending payment" orders are normal (people abandon the popup). A pending order with a matching captured payment in Razorpay means the webhook did not reach your site.
- Check the webhook log. Each webhook in the Razorpay Dashboard shows recent deliveries. Repeated failures usually point to a firewall, a security plugin or a maintenance-mode plugin blocking requests.
- Watch the settlement. Razorpay settles funds to your bank account on its own schedule. Make sure the first settlement arrives in the account you expect, and that the bank details in your Razorpay account are correct.
- Refund once. Refund one small order from the Razorpay Dashboard (or from the WooCommerce order screen if your plugin version supports it) and confirm the order notes and status update.
Also keep the plugin updated. Payment plugins change with WooCommerce's checkout, and an outdated version is a common reason Razorpay disappears from the block checkout after a WooCommerce update. Update on a staging copy first if your store is busy.
Troubleshooting
- Razorpay does not appear at checkout: check it is enabled under Payments, that your store currency is INR (or a currency your account supports), and clear any page cache. If you use the block-based checkout, update the plugin to the latest version.
- Orders stay "Pending payment" though money was taken: the webhook is missing, has the wrong secret, or is blocked by a firewall. Check the webhook's delivery log in the Razorpay Dashboard.
- "Authentication failed" error: the Key ID and Key Secret do not match, or you mixed a test key with a live secret. Regenerate and paste both again.
- Popup opens and closes immediately: a JavaScript optimisation setting (combine or delay JS) is breaking the checkout. Exclude the checkout page and the Razorpay script from JS optimisation.
FAQs
Is the Razorpay WooCommerce plugin free?
Yes, the plugin is free. Razorpay charges a transaction fee on each payment as per your agreement with them; check the current rates on your Razorpay pricing page.
Can I add Razorpay to WooCommerce before my account is activated?
Yes. You can install the plugin, use test keys and run test orders right away. Live payments only start after Razorpay approves your account and you swap in live keys.
Can I offer Razorpay and cash on delivery together?
Yes. Enable both under WooCommerce > Settings > Payments. See cash on delivery on WooCommerce in India for limiting COD to keep returns down.
Stuck on a step?
Tell me where you got stuck and I'll reply with a plan and a fixed quote, usually within 24 hours.